
Transaction Processing
Learn how different transaction types are processed.
Use these process diagrams to learn how different transaction types use the API endpoints. The exact process can vary depending on your service and configuration.
Vertex for Marketplaces
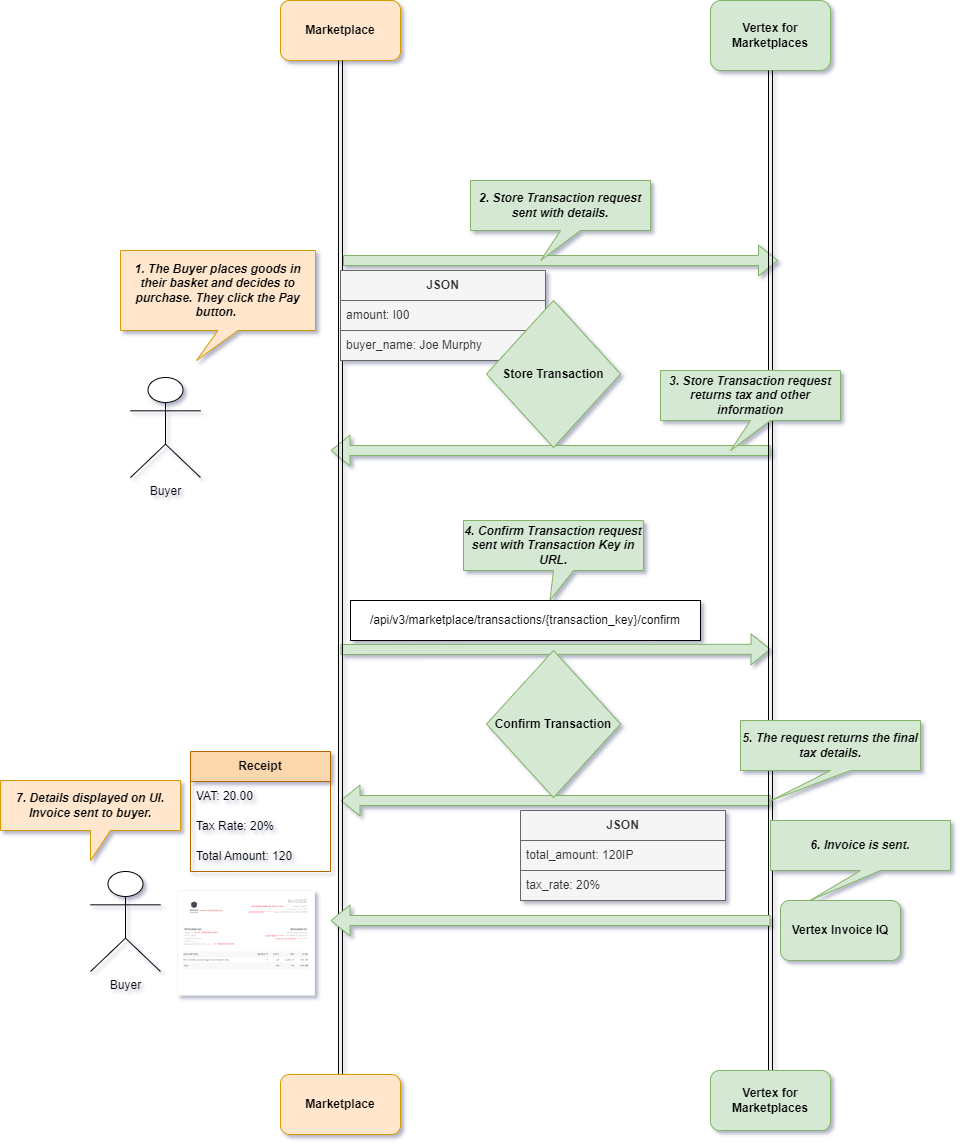
The following image shows an example of how you can use the requests to integrate with your marketplace:
Transaction Processing
The steps are as follows:
- The Buyer places some goods in their basked and clicks Pay.
- A Store Transaction request is sent. All the relevant information is modeled in the body of this request.
- The Store Transaction request returns tax and other information.
- A Confirm Transaction request is sent. The Transaction Key is specified in the request's URL.
- The Confirm Transaction request returns the final transaction details.
- The invoice is sent.
- Details are displayed in the UI. The invoice is sent to the buyer.
Integrated Vertex Invoice IQ
For more information, see Integrated Vertex Invoice IQ.
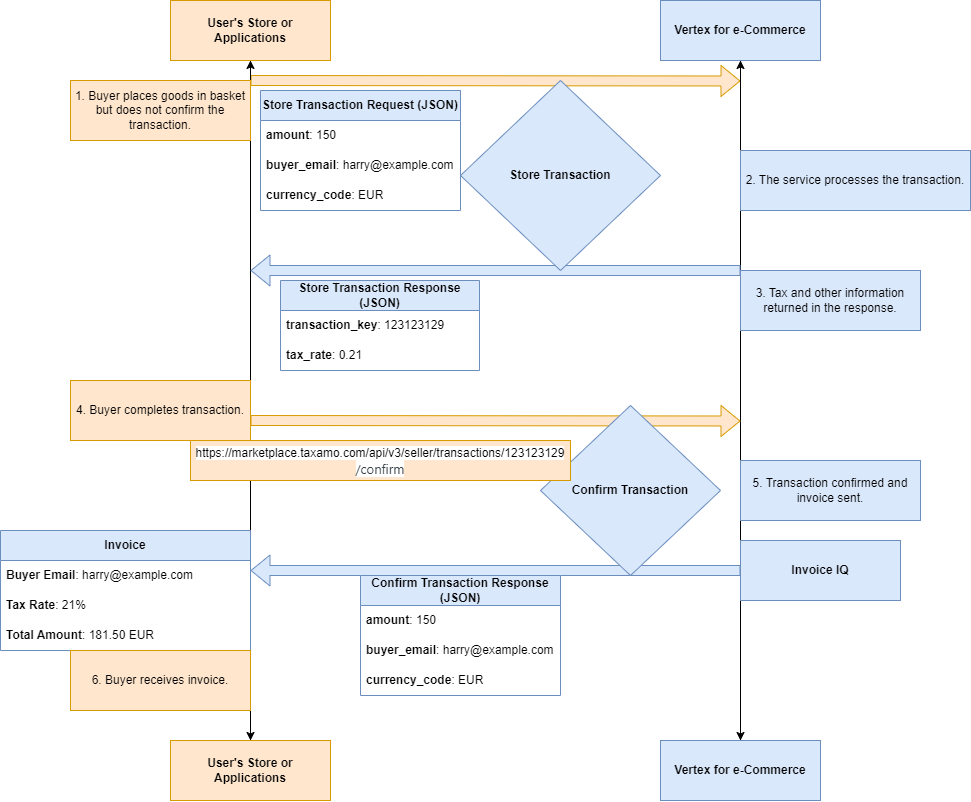
Here's what happens during simplified invoice processing:
- The buyer adds physical or digital goods to their shopping cart.
- Your store sends a Store Transaction request to the service.
- The service processes the transaction and returns tax information and a transaction key in the response.
- The buyer completes checkout and purchases the goods.
- Your store sends a Confirm Transaction request using the transaction key.
- The service confirms the transaction and sends the invoice to the configured recipient.
The following image illustrates simplified invoice processing.
Integrated Vertex Validator
For more information, see Integrated Vertex Validator.
Tax number validation
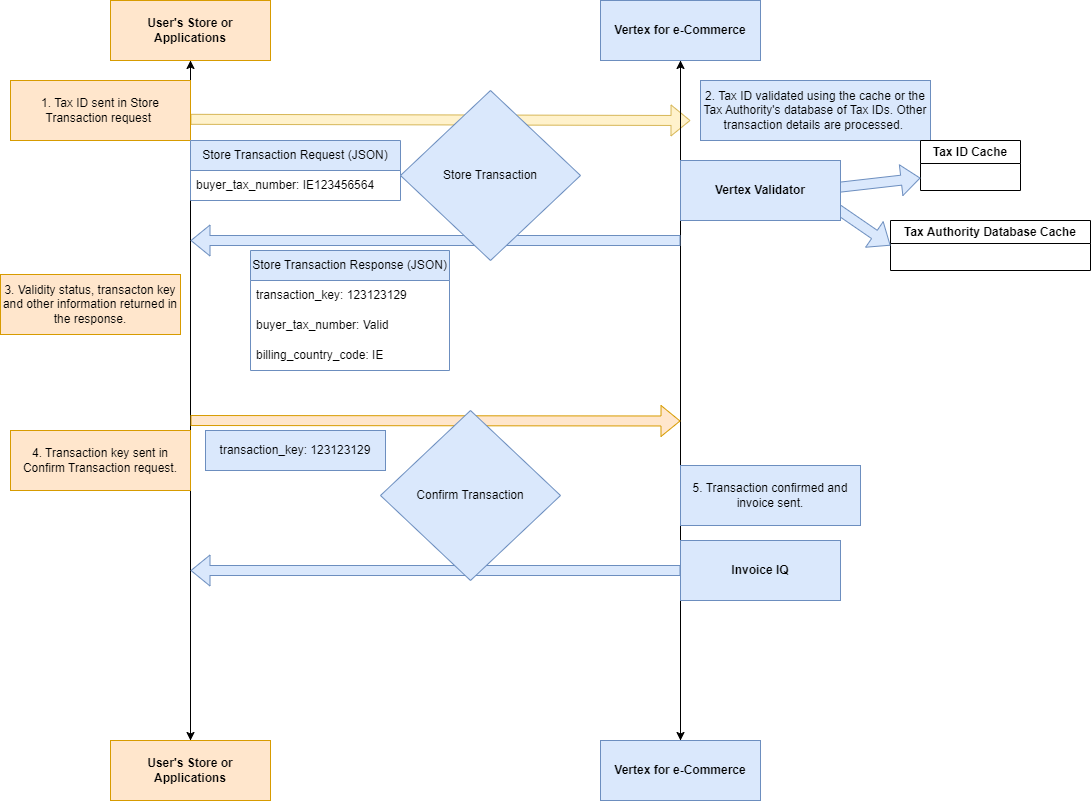
Here's what happens during simplified business-to-business (B2B) tax identification number validation:
- The buyer enters a tax number during checkout.
- Your store sends the tax number and other transaction details in a Store Transaction request. The tax identification number is sent in the
buyer_tax_numberorbuyer_tax_numbersfield. - The service validates the tax number. Depending on your settings, validation can range from a syntax check to verification against the applicable tax authority's requirements. The service can use a cache or a tax authority database for validation.
- The service returns the validation status, transaction key, and other transaction information in the response.
- Your store sends the transaction key in a Confirm Transaction request.
- The service confirms the transaction and sends the invoice through the service.
The following image illustrates simplified tax identification number validation.
Integrated Vertex Validator
Cache validation
Here's what happens during validation when the cache is set to 30 days (default):
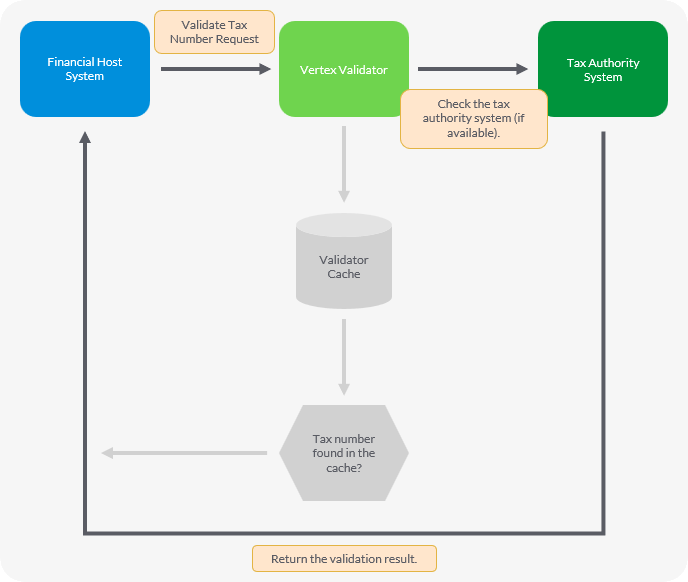
- The financial host system sends a Validate Tax Number request to the service.
- The service checks the cache for validation results created in the previous 30 days.
- If the cache doesn't contain the tax number, the service sends a validation request to the external tax authority system, when available, and returns the validation result.
- The service returns the validation result in the Validate Tax Number response.
The following image illustrates this process.
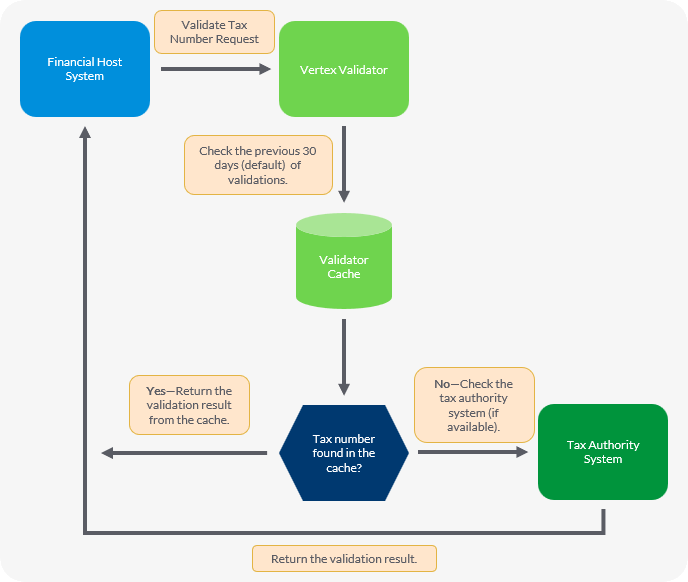
The service receives a tax number, checks the cache or the external tax authority system for validation data, and then returns the validation result in the response.
Standalone Vertex Validator
For more information, see Standalone Vertex Validator.
Real-time validation
Here's what happens during real-time validation (when the cache is set to 0 days):
- Send a Validate Tax Number request to the service.
{service_uri}/api/v3/tax_numbers/1234567890/validate&country_code=GB&business_name=Vertex&cache_expiry_timeout_days=0&on_error=proceed- The service checks the tax number against the tax authority system.
- The tax authority system returns the validation result.
- The service returns the validation result in the Validate Tax Number response.
{
  "invoice_address": {
  "freeform_address": "",
  "country": "GB"
},
  "buyer_tax_number": "1234567890",
  "tax_deducted": true,
  "billing_country_code": "GB",
  "buyer_tax_number_format_valid": true,
  "warnings": null,
  "buyer_tax_number_valid": true,
  "buyer_tax_number_normalized": "1234567890",
  "buyer_name": "Vertex"
}
The following image illustrates this process.
The service receives a tax number, checks the tax authority system, and returns the validation result in the response.
Bulk validation
Here's what happens during bulk validation in the service:
- Send a Validate Tax Number request to the service.
{
  "items": [
    {"input": {"tax_number": "123456789", "country_code": "PL"}},
    {"input": {"tax_number": "123456789", "country_code": "GB"}},
]- The service returns the response.
- Send a Poll Results request to retrieve the validation results.
{
  "items": [
    {
      "id": "ANKpMhAXMAA="
    },
    {
      "id": "ANKpMhAYMAA="
    },
  ]
}- The service returns the validation results from the initial request, including the
idandrequest_idproperties. - Send a Poll Last Seen Result request with
CMGpMhACMAAspecified in thelast-seen-idproperty.
{
  "items": [
    {
      "status": "processed",
      "request_id": "ANKpMhAXMAA=",
      "id": "CMGpMhACMAA=",
      "output": {
        "buyer_tax_number_valid": false,
        "buyer_tax_number_format_valid": false,
        "buyer_tax_number_validation_info": "tax-number-syntax-invalid"
        }
      },
      {
        "status": "processed",
        "request_id": "ANKpMhAYMAA=",
        "id": "CMGpMhAFMAA=",
        "output": {
          "buyer_tax_number_valid": false,
          "buyer_tax_number_format_valid": true,
          "buyer_tax_number_validation_info": "tax-number-invalid-according-to-external-service",
          "buyer_tax_number_normalized": "123456789",
          "buyer_tax_number_service_cache_used": true,
          "buyer_tax_number_service_cache_timestamp": "2026-01-15T14:29:54Z",
          "tax_number_service": "tax.service.gov.uk.api"
        }
      }
]- The service returns the current validation status in the response.
"items": [
  {
    "status": "processed",
    "request_id": "ANKpMhAXMAA=",
    "id": "CMGpMhACMAA=",
    "output": {
      "buyer_tax_number_valid": false,
      "buyer_tax_number_format_valid": false,
      "buyer_tax_number_validation_info": "tax-number-syntax-invalid"
      }
    },
    {
      "status": "processed",
      "request_id": "ANKpMhAYMAA=",
      "id": "CMGpMhAFMAA=",
      "output": {
        "buyer_tax_number_valid": false,
        "buyer_tax_number_format_valid": true,
        "buyer_tax_number_validation_info": "tax-number-invalid-according-to-external-service",
        "buyer_tax_number_normalized": "123456789",
        "buyer_tax_number_service_cache_used": true,
        "buyer_tax_number_service_cache_timestamp": "2026-01-15T14:29:54Z",
        "tax_number_service": "tax.service.gov.uk.api"
        }
    }
]{
"invoice_address": {
"freeform_address": "---",
"country": "DE"
},
"buyer_tax_number": "123456789",
"tax_deducted": true,
"billing_country_code": "DE",
"buyer_tax_number_format_valid": true,
"warnings": null,
"buyer_tax_number_valid": true,
"buyer_tax_number_normalized": "123456789",
"buyer_name": "---"
}
Digital goods
For more information, see Digital Goods.
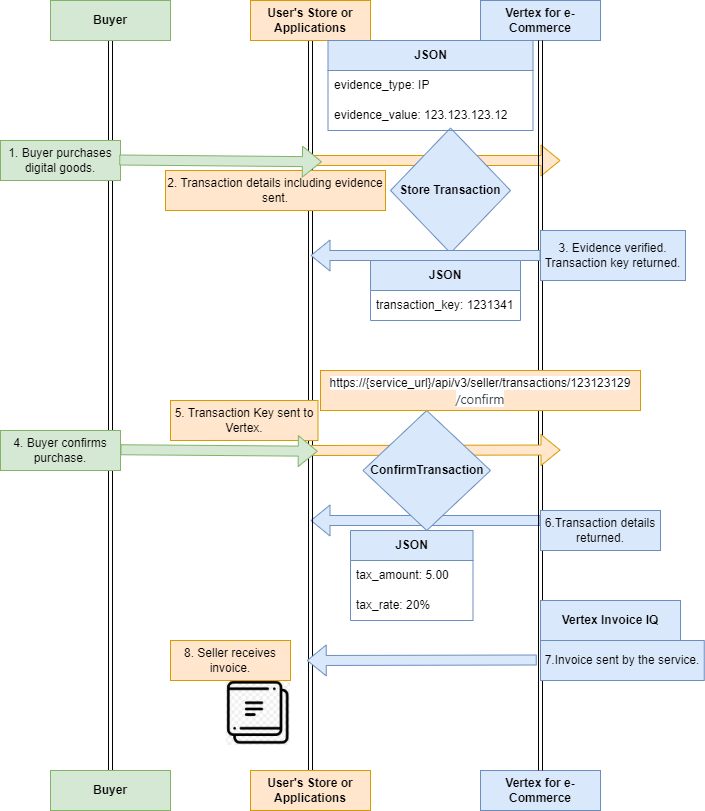
Here's what happens during transaction processing for digital goods:
- The buyer purchases digital goods from the merchant's store.
- The store sends the transaction details, including location evidence, in a Store Transaction request.
- The service verifies the location evidence and, if successful, creates a transaction and transaction key. The service returns the transaction key in the response.
- The buyer completes payment. The merchant's store sends a Confirm Transaction request after payment is confirmed. The request includes the transaction key created in the previous step.
- The service processes the confirmation and returns the transaction details.
- The service sends the invoice to the configured recipient.
- The buyer receives the invoice.
The following image illustrates transaction processing for digital goods.
Refunds
For more information, see Refunds.
Refunds are modeled using the Refund Transaction request. An example process flow is explained in the following image:
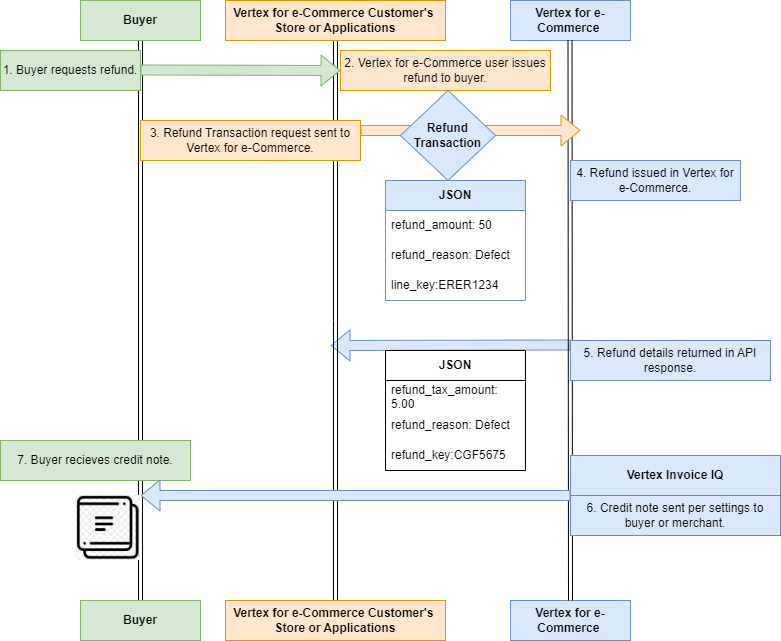
The example process flow is as follows. This is a simplified example. Becaudr the API is highly customizable, your deployment can vary in any number of ways.
- Buyer requests refund: The buyer requests a refund by whatever means are allowed on the merchant's store.
- Vertex for e-Commerce user issues refund to the buyer: You (the merchant/Vertex for e-Commerce user) decide this is a valid refund and issue the refund in their system that is in their e-commerce store or via their payment provider.
- Refund Transaction request sent to Vertex for e-Commerce: You use the Refund Transaction request to integrate the refunds in Vertex for e-Commerce with your store or applications refunds. The request specifies details like the amounts and so on. This is processed and useful information is returned in the response. A credit note may also be sent to the liable party. This can be the buyer or seller and is dependent on other settings.
- Refund issued in Vertex for e-Commerce: The request is processed by the service.
- Refund details returned in the API response.
- Credit sent per settings to buyer or seller: A credit note is sent to the email specified in the
buyer_emailfield. - Buyer receives credit note.
Updated 3 months ago